


Banner Material for Street Pole and Double-Sided Displays
UNISIGN · Double-sided banner roll selection
Choose double-sided blockout PVC for a banner with an image on each face. The blockout layer separates the two graphics. Match the roll to the print process, finished size and pocket design.
UNISIGN supplies unprinted banner rolls for print shops, sign makers and distributors. Compare the roll specifications, then request material samples for your production line.
- 2printable faces
- 3blockout models
- 50 mstandard rolls

Start With 4 Material Checks
| Check | Put this on the order |
|---|---|
| Two printable faces | Product code and print process for each face |
| Blockout construction | A printed sample with dark artwork opposite a light area |
| Roll size and mass | Width, length, GSM, core size and packed roll mass |
| Pocket and edge finish | Finished drawing, joining method and approved production sample |
Release production after the printed and finished sample passes the job’s written checks.
Compare Double-Sided Blockout Rolls

CDM2525/510
- Printable faces: both sides
- Woven base yarn: 250 × 250 D
- Listed widths: 1–3.2 m; 5 m
- Standard roll length: 50 m

CDM55/610
- Printable faces: both sides
- Woven base yarn: 500 × 500 D
- Listed widths: 1–3.2 m; 5 m
- Standard roll length: 50 m

CDM11/800
- Printable faces: both sides
- Woven base yarn: 1000 × 1000 D
- Listed widths: 1–3.2 m; 5 m
- Standard roll length: 50 m
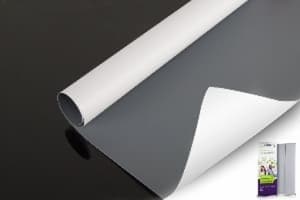
Model specifications come from the linked product pages. Photos show coated blockout material samples used on those pages.
All three models list solvent, eco-solvent, UV and latex ink families. Use the profile and drying or curing process for the selected printer, ink and material.
For the full range, see double-sided banner materials and PVC blockout rolls.
Keep Both Graphics Clear
Print a high-contrast test with a pale panel on one face and a dark panel on the other. View each face in daylight, including sunlight behind the banner.
- Record the model, ink, profile and lighting.
- Photograph face A and face B.
- Keep the approved sample as the production reference.
“Black back” describes a reverse surface. It does not specify a second printable face. Buy material explicitly listed for double-sided printing.
Blockout separates two images. A backlit graphic uses transmitted light. For a light box, use the PVC lightbox material guide.
Align the Print With the Finished Shape
The print file and finishing drawing need the same reference points: image, cut line, fold line and pocket.
- Mark both filesLabel the top edge and feed direction.
- Use registrationFollow the printer’s double-sided workflow.
- Print full lengthPrint one sample on both faces.
- Measure 3 placesRead image-to-cut position at the start, middle and end.
- Record the offsetCompare the largest offset with the job’s written tolerance.
- Keep artwork clearPlace text and logos outside pocket and seam zones.
Put the finished size, fold lines and seam positions on the artwork proof. Give the printer and finisher the same layout.
Sewn and Welded Pockets: Test the Finished Construction
A pole pocket is the sleeve that receives the support arm. Lay-flat pocket width and arm diameter are different measurements. Use the selected hardware’s drawing for pocket dimensions and fit.
Make the pocket from the printed production material. Let a welded test piece cool before testing the bond.
- Record the material, ink process and joining settings.
- Measure the finished pocket and inspect the seam.
- Keep the test method, measured result and pass limit with the sample.
- Repeat the sample check after a material or setting change.
| Route | Record the setup | Inspect the sample |
|---|---|---|
| Sewn pocket | Thread, needle, stitch type, stitch length and reinforcement | Skipped stitches, damaged holes, loose thread and puckered edges |
| Welded pocket | Machine, heat, speed or dwell time, pressure and seam width | Gaps, peeling, scorch marks, distortion and uneven feed |
| Either route | Model, fold size and finished dimensions | Arm fit, straight edges, image position and the specified seam-test result |
Calculate Roll Material Mass
Material mass (kg) = width (m) × length (m) × GSM ÷ 1,000
| Model | Example roll | Calculated material mass |
|---|---|---|
| CDM2525/510 | 3.2 m × 50 m | 81.6 kg |
| CDM55/610 | 3.2 m × 50 m | 97.6 kg |
| CDM11/800 | 3.2 m × 50 m | 128.0 kg |
These figures use nominal GSM and exclude the core and packaging. Use packed mass for freight and the printer’s loading limit for roll handling.

Give the Installation Team a Complete Brief
The pole, foundation, brackets and fixings form the support system. Assign its load review to the pole supplier or project engineer. Provide banner dimensions, number per pole, material mass, bracket details, installation height and site conditions.
Street-Pole Material Questions
Is every 18 oz banner a street-pole material?
No. Weight alone does not specify two printable faces, blockout performance, seam strength or hardware compatibility. Select the named material and finished construction against the project specification.
Is black-back banner the same as double-sided blockout?
No. A black reverse surface does not specify a second printable face. The three coated blockout models above explicitly list printing on both sides.
Does heavier material remove the need for a pocket test?
No. Test the printed, finished pocket used in the job. The test covers the chosen material and joining setup.
Do these roll weights include the core and packaging?
No. The table calculates material mass from nominal GSM and roll area. Core, wrapping and pallet mass are separate.
Send 6 Details for a Roll Quote
- Product code
- Roll width and length
- Quantity and delivery destination
- Printer and ink
- Finished banner dimensions
- Pocket and edge drawing
Sources and production notes
UNISIGN model pages checked 20 September 2026. Production steps describe sample acceptance, not completed model tests. General references: